This weekend, my step daughter's and I recreated one of their bedrooms. We bought our house over a year ago and have slowly made improvements, but this one was way over due.

Before the changes, the room was a typical beige-neutral (aka really boring-blah). I would imagine that's because the owner's before us had it set up as a guest room. Having been a teenager myself once, I realize the importance of having your own space that represents your taste where you feel comfortable spending time. Although we had discussed this project many times, my middle step-daughter, Angel, and I decided it was to get it done.
We started Saturday afternoon by picking out the paint colors:
While we were out, I was looking for these circle foam things. I didn't know what they were called, but I had seen them at Home Depot and Michael's. They look like this:

But alas, the fates were against us that day. When I asked the associates if they knew where I could find them, they all looked at me like I had three heads. Very discouraging. However, while at the craft store, we found a great back up plan: Styrofoam circles. More on what we did with these in a minute.
We originally decided to do a two-tone color scheme. We were going to do the light pink on top and dark pink on the bottom. Angel taped off the wall and we started painting. About half way through the top section, I thought it would be cool if we did a faux-wainscot look on the bottom half by painting contrasting pink stripes. At the time, this was a great idea and all the girls were very excited. However, once we started taping off the rows one by one, we thought maybe we were in over our heads. An hour and a half later, we were ready to go with the first color. In hindsight, we should have painted the whole room light pink first, then done the dark pink stripes over the top.
Peeling the tape away after the paint dried was like magic. Beautiful, lovely contrasting lines of pink covered the wall. I was so delighted! I think I was more excited than Angel.

To add the finishing touch to the paint, we added a one inch black border between the solid color on top and the stripes on the bottom. It was then we realized the room looked very much like a Victoria's Secret shopping bag. But that's ok. Those bags are so cute.
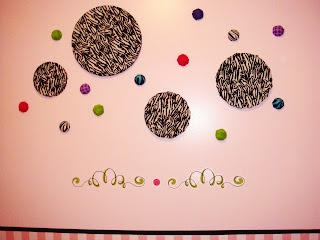
As I mentioned before, I wasn't able to find the foam circles I originally wanted to use for the wall. So, using the Styrofoam stand-in's, we picked out varying sizes as well as some 3" spheres. We cut the spheres in half so they'd stick on the wall, then covered them with the same fabric I used to make her quilt and pillows last Christmas. Her bed doesn't have a headboard, so we made a "headboard illusion" by placing the covered Styrofoam in random spots above her bed.
I also hung up some of the leftover paper lanterns in the corner from the
bachelorette party I had hosted a few weeks before. Because the room had so much pink already, we chose a dark purple curtain for the windows accented by a white curtain with bright colored dots and circles. I bunched the white curtain with a hair tie and slid in a large blue Gerber daisy.
We added some stickers under the fabric circles to frame the pillows on the bed...
...And voila: Here is the final product: