Search

Monday, February 28, 2011

Yo Yo's

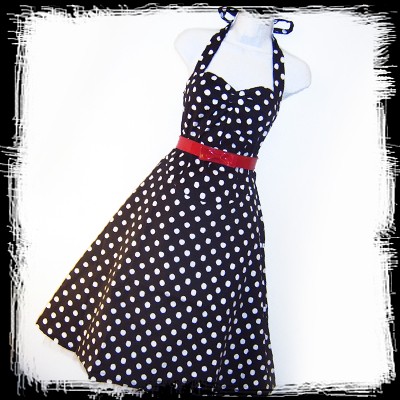
Don't buy me. I will suck the life out of you.


While waiting for my animals to receive their annual shots, I decided to visit the craft store. My daughter has taken an interest in crafting - sewing in particular - as of late, so I decided to help that seed grow. I found a simple sewing machine which I thought would be great for a beginner. Not too many bells and whistles, just the basics.

This thing made me want to whip out the old needle and thread, hand sew what we were working on, then climb to the top of a 30 story building, throw this "sewing machine" over the edge and watch it plummet to its death. We spent more time re-threading this thing than we actually did sewing. You can't even use normal thread with it. You have to buy special small spools with poor-quality thread. It is the worst possible investment ever! Maybe I just got a lemon, but if you are considering purchasing the purple Pixie machine (made by Singer), save yourself the $40 and pay someone to make your project instead.

Adorable yo yo's!
Anyway, now that I've done my consumer report, I wanted to tell you about a fabulous new discovery I made over the weekend. I learned about Yo Yo's!

I know, they've been around forever and I can't believe I'm just now hearing about them, but these things are capital-A dorable. My daughter and I made some simple children-sized aprons and attached some of these little delights. They make a world of difference to the overall appearance and detail. They're also easy to make while sitting around. I bought a couple of plastic yo yo makers at the craft store. I think this is probably the easiest way to make them, but I also found some instructions on how to make them without the plastic forms (see below).

Contributed by ehow.com

INSTRUCTIONS

Things You'll Need:
Circle Template
Pencil
Scissors
Small scraps of fabric
Needle
Strong sewing or quilting thread

Fabric Yo-Yo Making SuppliesGather your supplies. If you are working on a specific project you might want to coordinate your fabrics. I like to sew a bunch of these up while watching NCIS or Burn Notice so I just grab whatever fabric scraps I have, whip up the yo-yos and pop them in a storage container for a "rainy day".


Trace Around Your TemplateTrace around your circle template on the "wrong" side of your fabric. Remember that this circle will be come quite a bit smaller when you make it into a yo-yo. If you want a specific size keep these measurements in mind:
1 1/2" circle makes a 3/4" finished yo-yo
2" circle makes a 1" finished yo-yo
3" circle makes a 1 1/2" finished yo-yo


Cuting Out Circles of FabricFollowing the line you've drawn with your template, cute out the fabric circles.


Start SewingThread your needle and tie a knot at the end of the thread. With the "wrong" side of the fabric facing up, turn over 1/4" of fabric toward the center. Push your needle up the the wrong side of this little bit of turned fabric so the knot is in the fold.


Running StitchWork a running stitch around the circle turning the fabric over 1/4" as you go. Try to make your stitches about 1/4" apart. Any smaller and the hole of the yo-yo will be too big.


Stitch Around the Circle
Sew all the way around the circle until you come back to where you started. The yo-yo will starts to curl up a bit.


Gathering Your Fabric Yo-YoHold the fabric circle at the knotted end of your thread and pull the needle firmly to gather up the stitches. Your flat circle will bunch up and become a 3D yo-yo. Take a couple little stitches where the thread comes out to secure your yo-yo in place.


Once you make a fabric yo-yo and see how simple it is to whip up a bunch you'll look at your scrap fabrics in a whole new way. Glue them to a hair clip or barrette, cover a pillow, layer different colors and sizes and make into a pin; the possibilities are endless!

Friday, February 25, 2011

Exciting News!

Due to the growing number of products we are offering, our For Sale page was getting pretty full.

To make your shopping experience easier, we've started a new website dedicated to our store. Our products are now separated by category for better browsing.

If you would like to sell your product(s) on our page, just send us a picture, name, price and description of the item or items you want to sell. Once it's sold, we'll send you an e-mail with the buyers information. The funds will be wired directly to your PayPal account.

Now then: Who is looking forward to the weekend? We've been working on some new patters over the past couple of weeks. I think you will like what we've come up with. I'm a sucker for retro-style dresses. I've found a pattern that I LOVE and so far I've made two dresses.

Eeeee, how adorable is this?!

This one is very similar to the one I made last weekend.

Steph has been sewing like crazy on some adorable baby clothes. I don't want to spoil the reveal, but polka dots are involved. They should be available for sale by Monday!

Tuesday, February 22, 2011

Some Organization is in Order!

Brag Board

This idea comes from Lindy in Utah. I love this!

"This is my project from today and yesterday.

I just cut boards to size of a hallway or space...I made it easier and bought ones that were already painted white. Then I screwed them to the studs in the wall...then mod podged (is that a word?) polka dot scrapbook paper onto the face of them.

I pulled apart wooden clothespins, painted them,  reassembled them then glued them on.

Now all my daughter's paintings and things she brings home from nursery don't have to live on my fridge - and she feels special to have her very own art exhibit."

Hair Clip Organizer

Here is another clever idea from Lindy. If you have little girls, you undoubtedly have a drawer full of clips, bows and other hair accessories. Lindy came up with a clever idea to organize all of her items. The hanger on the left has different colored ribbons with corresponding colored hair accessories clipped on. If you know how to macrame, you can cover your hanger with whatever color you want. Then just loop the ribbon pieces and attach your accessories.

The second item in the picture was inspired by the recent Disney movie, Tangled. The movie is about Rapunzel who is known for her long blond hair. This braided yellow yarn is tied off at each end with a ribbon and holds her hair clips with ease.

I love this idea because it encourages young children to want to be neat and organized. Rather than nagging your child to put something away, you can make it fun with simple ideas like this.

Friday, February 18, 2011

Go Ahead...Play With Your Food!

Remember when you were little and you had to eat your vegetables? But instead of eating them, you'd just kind of push them around your plate to make it look like you had eaten most of them? My mother was never fooled by such things as I'm sure yours was not, either.

But who says playing with your food can't be a good thing? I found some interesting and clever ideas for enhacing the overall look of those pesky healthy foods. Whether you're a mother trying to get your toddler to eat their peas or a grown person trying to choke down a couple of carrots yourself, try some of these ideas and see how fun playing with your food can be.
You might want a helper for this one.
Owls?? So cute!
This one makes me giggle.
A rice panda? Are you kidding me? Awesome!

Butterfly Apple. Genius!

Monday, February 14, 2011

And the Winner Is...

Rachel from Utah! Thank you to everyone who submitted their Valentine stories, recipes and craft ideas. Now read on and celebrate Singles Awareness Day!

Joni from Maine writes:
"It was my first Valentine's Day with my boyfriend, Mark. I had been giving significant hints the last two weeks leading up to February 14th that I wanted to go to a certain restaurant to celebrate. I got all dressed up, got a mani/pedi and had my hair done by my stylist.

After all this, I was sure my boyfriend would think the pricey restaurant would be worth it. However, he called me 20 minutes before he was supposed to pick me up and told me he was running late. When he finally showed up (45 minutes later), he was holding a six pack of beer and some K-Y Jelly. He thought it would be better to 'stay in'."

Kat from Colorado shared this gem:
"When I was in school, the student council would sell carnations for $1.00 a piece. It was obvious who the popular girls were because they would be loaded with flowers. I had a huge crush on one of the popular boys so to make myself look more desirable, I decided to buy myself 15 flowers. I paid for my flowers and filled out the cards, all from "secret admirers". But, when I went to turn them in to be delivered, the guy I had the crush on was the one taking the cards. Instead of being even more humiliated, I kept the cards and never had the flowers delivered."

Jeni from California had a rather pleasant experience:
"My husband always goes above and beyond the call of romance on Valentine's Day. One year, he hired a singing telegram to come to my work and perform a song he wrote himself. Another time, he visited me wearing a gorilla suit and handed me a dozen red roses. Last year, he filled my car with heart-shaped balloons and covered it in rose petals. He puts so much thought into making it special for me every year. I'm so lucky!"

Rachel from Utah submitted this story:
"It was my husband I's first Valentine's Day together as a married couple. I was so excited and I really put a lot of thought into what to get him. He did, too. However, I was dieting that year so he knew the traditional Valentine's Day treats were out. So Valentine's Day finally arrived and we exchanged gifts. I gave him all things fit for a romantic sexy eventing and I got a gift bag full of 100 calorie snacks. I tried so hard not to show my complete disappointment because I know he actually tried, but nothing kills the romantic mood like getting diet food from your husband on Valentine's Day!"

Sunday, February 13, 2011

Whole Wheat Bread Recipe

Whole Wheat Bread
makes 4 loaves
contributed by Stephenie Myers

Okay, so we love homemade bread at our house. What better smell is there than the smell of fresh baked bread? I dreaded learning to make whole wheat bread because of its heaviness and feeling like I just ate a brick. So, I have looked everywhere for recipes that I like and my family will eat, but is also good for sandwiches too. I have several good recipes now in my collection but here is one of our better ones.

7 cups whole wheat flour
2/3 cup vital wheat gluten
2 1/2 Tbs yeast
5 cups water (120-130 degrees F)Mix the above ingredients together and let sit covered for at least 10 minutes. After letting it sit, add in the following ingredients.

2 Tbs salt
2/3 cup oil
2/3 cup honey or 1 cup sugar
2 1/2 Tbs lemon juice
2 Tbs liquid lecithin

Mix for 1-2 minutes until combined. Add in as much flour to equal 5 cups as possible. Dough should be a soft dough that isn't dry. Mix for 10 minutes to help the gluten in the bread. After mixing, separate dough into 4 equal portions. Form into loaves and place in greased loaf pans. Place pans in a warm oven to rise until bread is just to the top of the pan. Leaving bread in the oven, turn oven to 350 degrees F and bake for about 30 minutes or until bread is done and bottom of bread sounds hollow. Remove from pans to cool. This bread has a nice soft and chewy texture that is great for toast, sandwiches, or just plain eating. You will not believe you are eating whole wheat bread after trying this!

Love of the Apron

I love aprons! They remind me of simpler times. I've been experimenting with some different styles in the last few weeks. I'm sure more styles will follow. I'd love to make something with a giant bow around the front waist. I'll also be making some 1/2 aprons for gardening since spring is just around the corner (I think).
All of the following are for sale and can be customized with a monogram for free!


Saturday, February 12, 2011

Sinfully Rich Chocolate Truffles Recipe

Chocolate Truffles

Sinfully Rich Chocolate Truffles
Contributed by Cindy Chandler

¼ C Heavy Whipping Cream
8 oz Semi-Sweet Chocolate chips
6 T Unsalted Butter
1/3 C Unsweetened Cocoa

Directions
Bring cream to a simmer. Remove from heat and stir in chocolate and butter.  Place in a double boiler and stir until the chocolate is melted. Pour into a shallow bowl and refrigerate at least 2 hours. Take small amounts and roll into balls and roll into either powdered sugar or cocoa powder. These are very rich and decadent!

Friday, February 11, 2011

Current Events

According to Google, today is (or would have been) Thomas Edison's 164th birthday. I love electricity! It's one of those things you don't know you rely on so immensely until it's not there.


For example, one night I tucked myself snugly into bed anxiously awaiting the next morning. I checked my alarm clock and drifted to sleep. I woke up the next day puzzled by the fact that the sun had risen 2 hours earlier than it normally did. Still groggy from my slumber, I rolled over to check the time. A black screen stared back at me. I suddenly realized my alarm must not have gone off and jumped out of bed. I unplugged my cell phone from its charger only to discover it was not responding to my forceful thumb pressing on its buttons. Not only did I have no idea what time it was, I had no power! I frantically ran around my house looking at all the usual places to find out the time. The microwave: Obviously not. The stove: No power there. The guide on my TV: Mmmm, nope. Now I was stuck wondering what time it was and with no way to contact my work. Who has a land line anymore, anyway?

I started biting my lower lip wondering what I should do. I wasn't even sure if my shower would turn on without electricity. "I'll call the power company and find out what's going on," I thought. Oh, right. My phone is dead. That made me think the power must have been out for quite a few hours. Being without electricity had completely thrown me for a loop. How do I function? Will the toilets flush? Will I have to replace all the food in my fridge? How will I do my hair?

I decided I would try the shower. Ah, apparently plumping and electricity are not completely reliant on each other. I hurried and washed my hair, hoping the water would stay warm long enough for me to finish rinsing. I jumped out of the shower and felt around in the dark for my towel.

After getting dressed, I looked down at my feet and noticed my socks. One black, one brown. I pulled my sock drawer out of the dresser so I could look at them in the sunlight beaming into my bedroom.

Speak no, hear no, see no electricity.

I quickly threw my hair up on a haphazard bun and grabbed my make up bag. I got in my car and applied my make up using the two-inch mirror from the sun visor on the passenger side. At this point, I realized I had forgotten my phone. But, halfway up the steps, I remembered it didn't matter because it was useless anyway.

I got back in the car and drove the 18.7 miles to my work. I thought it odd no one else was in the parking lot. Then I remembered: It was SATURDAY!!! I could not believe it. But, I was at least able to check the time on my car clock.

See? Electricity it awesome. My life is a mess even with it; I couldn't imagine what other chaos would come my way without it.

If you would like to show your kids how electricity works and talk about some cool brainy stuff, visit this link for a cool how-to. Have a great weekend everybody and stop by Monday morning when we announce the winner of our Valentine Contest!

Monday, February 7, 2011

Chivalry and Romance

I was recently listening to a radio D.J. discussing valentines day traditions and noticed it seems to be pretty standard for women to receive flowers, cards, chocolates and a nice dinner. What happened to creativity? There have to be better ways of personalizing this special day for the one you love.

I started looking around and found some great resources for those who want to think outside the box. You can also check out the new Valentine craft I posted.
I have a special plan for my beau but I won't be able to discuss until after next Monday. I wouldn't want to spoil the surprise!

Send us your ideas and you could win a product valued up to $25.

Remember, chivalry isn't dead as long as we keep it alive.

Saturday, February 5, 2011

Best Ever Hot Cocoa Mix Recipe


Best-Ever Hot Cocoa Mix
Makes about 20 servings
Contributed by Cook's Country

3 cups nonfat dry milk
2 cups confectioners' sugar
1 1/2 cups Dutch-processed cocoa powder
1 1/2 cups white chocolate chips
1/4 teaspoon salt

Directions
Combine ingredients in large bowl. Working in two batches, pulse ingredients in food processor until chocolate is finely ground. Store in airtight container for up to 3 months. To make hot cocoa, stir 1/3 cup of this mix into 1 cup of hot milk. Top with whipped cream or mini marshmallows.

BBQ Chicken Pizza Recipe


BBQ Chicken Pizza
Contributed by Gina Garn

1 Rhodes white bread loaf (package comes with 3 loaves)
1/3 large red onion, chopped
3/4 green pepper, chopped
5 chicken tenders
Your favorite BBQ sauce
Shredded mozzarella cheese

Directions
Crust: Let 1 roll of dough rise for about 9 hours. Wrap the dough in saran wrap to prevent it from getting a skin. Once dough is risen, roll it into a pizza shape using a rolling pin. Use flour if dough is sticky. Place on pizza pan. Roll sides of dough to form a crust. (If you want cheese stuffed crust, roll mozzarella string cheese sticks into crust.)


Chicken: Put chicken tenders in a frying pan and add hot water, just enough to cover chicken. Add a squirt of BBQ sauce and stir. Put stove on medium and let chicken simmer for about 8 - 10 minutes until thoroughly cooked. Chop chicken into small bite size pieces. In a small bowl, stir 1/3 cup of BBQ sauce with chicken.
Heat oven to 425 degrees. Put BBQ sauce on pizza dough, too much is not good, but put enough on to cover evenly. Add cheese, again not too much but a good amount.. Add chicken, peppers, and onions. Bake in oven for 15 minutes.

Makes about 8 good sized slices.

Thursday, February 3, 2011

6 More Weeks of Winter

With winter storms ever present, global warming seems to be getting less and less likely. It certainly is cold here in the Rocky Mountains, but at least we're not being pummelled by neverending snowstorms.

All this cold weather provides ample opportunity to stay inside, make some hot cocoa and watch a great movie. What is your favorite comfort food? Do you have something your kids beg you to make on special occasions? Share it with The Kissing Frog and you can get free stuff! Visit our Win It! page for more details.

We hope you're staying warm this week. Don't be shy; send us a message, post a comment or chat with us. Don't forget about our Valentine Contest! Get your entries in before next Sunday the 13th for your chance to win.

Tuesday, February 1, 2011

Kusudama Flowers

Kusudama Flowers
 I've always loved the art of origami. My step daughter and I decided to make some paper flowers for her mom last Mother's Day so she could keep them forever instead of having them die. It would also be something pretty to show off instead of a card that would eventually end up in a drawer.
After googling high and low, we found
this site. Emilee and I worked on the Kusudama Flowers. We made a bouquet for her mom and a Kusudama Ball for her grandma.

These are so fun to make! Our fingers were pretty sore after making 36 flowers, but the end result was definitely worth it. We used a pop can as the vase and prettied it up with some transparent paper.

Heart String Craft


Heart String
Heartstring
Transform cardboard tubes into love tokens, then display them as a mantel garland or door decoration.

Materials

Cardboard tube
Paintbrush and red paint
Pushpin
Needle
Embroidery thred
Beads (with holes large enough for the needle to pass through
Instructions
Heartstring - Step 2 i1. Cut the tube in half and brush the halves inside and out with red paint. Let them dry.
2. Flatten the halves, then cut them into one-inch segments. Shape each segment into a heart by pushing one creased side toward the center. Pierce holes in the top and bottom of each heart with a pushpin.


Heartstring - Step 3


3. Thread the needle and knot the end. Slide on a bead until it stops at the knotted end, then loop back and push the needle through the bead again, going from bottom to top.


Heartstring - Step 4
4. Thread on a heart, then add a bead just above it, using the same looping technique to secure it in place. Repeat to create a string of hearts and beads.